Step 02.39 — Assemble a Z idler cage
Step 39 of 44 · Chapter 02 — Z drives, Z idlers, Z rails, deck panel
Tap to enlarge
 Gather for this segment — steps 02.39–02.40 (~20 min)
Motion box
- GT2 20T 9 mm idler ×4
Fasteners, Tools & Misc box
- M3×16 SHCS ×4
- M3 hexnut ×4
- M5×30 BHCS ×4
Printed parts
z_tensioner_bracket_a×2 · bin 02-Z0, 02-Z2[a]_z_tensioner_9mm×4 · bin 02-Z0, 02-Z1, 02-Z2, 02-Z3z_tensioner_bracket_b×2 · bin 02-Z1, 02-Z3
Already on the bench
- the four idler cages
Parts:
-
z_tensioner_bracket_a×2 · bin 02-Z0, 02-Z2 -
z_tensioner_bracket_b×2 · bin 02-Z1, 02-Z3 -
[a]_z_tensioner_9mm×4 · bin 02-Z0, 02-Z1, 02-Z2, 02-Z3 - M3×16 SHCS ×4 · Fasteners, Tools & Misc box
- M3 hexnut ×4 · Fasteners, Tools & Misc box
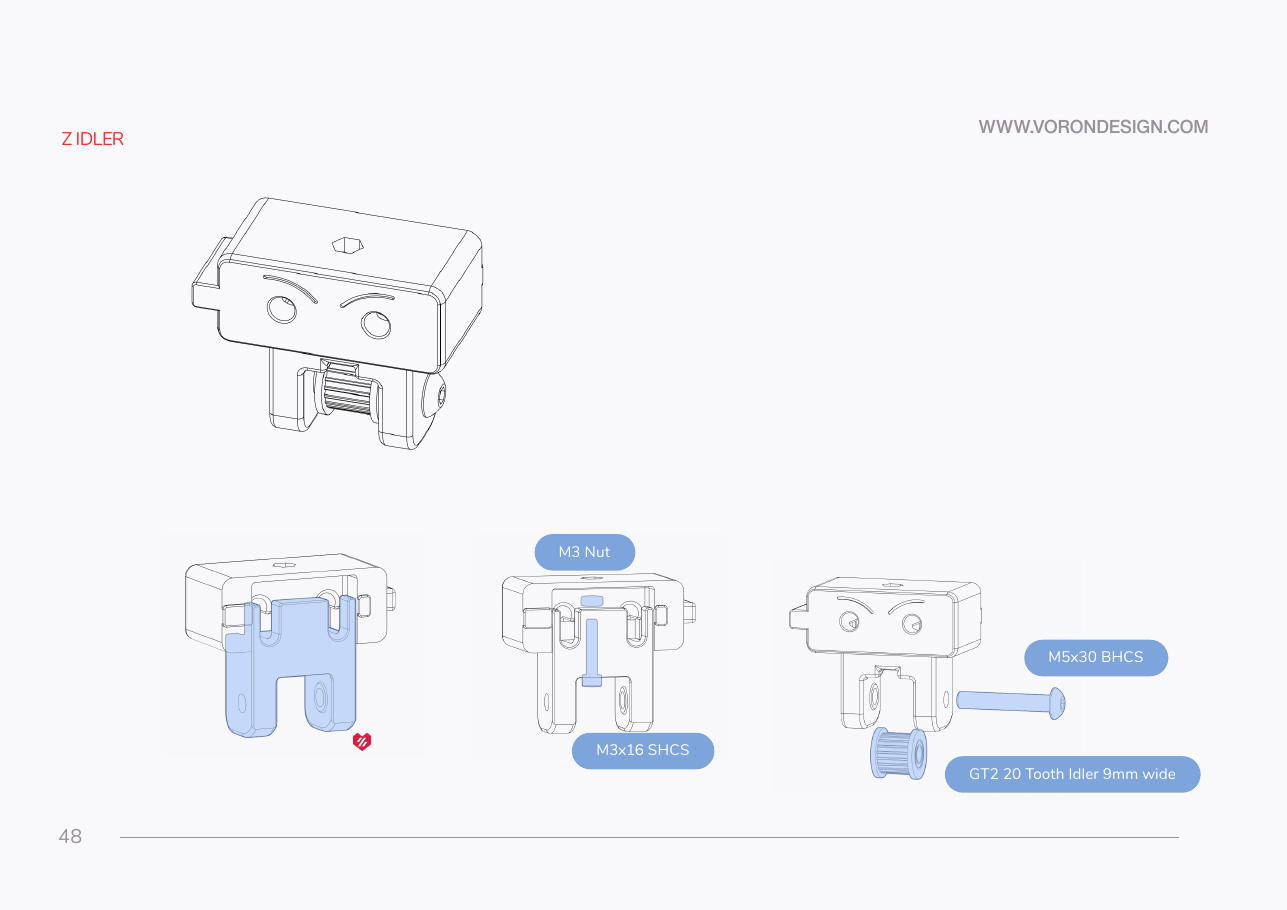
Do: Build four cages, two _a and two _b. Drop an M3 hexnut into the bracket's pocket. Slide the blue tensioner in and run an M3×16 SHCS up through it into the nut. Leave it a couple of turns short of tight.
 Check
In all four, nut captive, screw engaged, tensioner sliding smoothly in the bracket with no side play.
What you're looking at
Manual p.48: the Z idler, the assembly at the top corner that turns the long Z belt back down. z_tensioner_bracket is the printed cage that bolts to the frame; the blue [a]_z_tensioner_9mm slides inside it on the screw you tension the Z belt with in Ch 06.
 Tip
In plan, print face down, the slider channel's open side toward you and the two oval slots left–right: tab on the left = _a, on the right = _b.
Source: Voron manual p.48 · Video: Part 2 @1:37:11