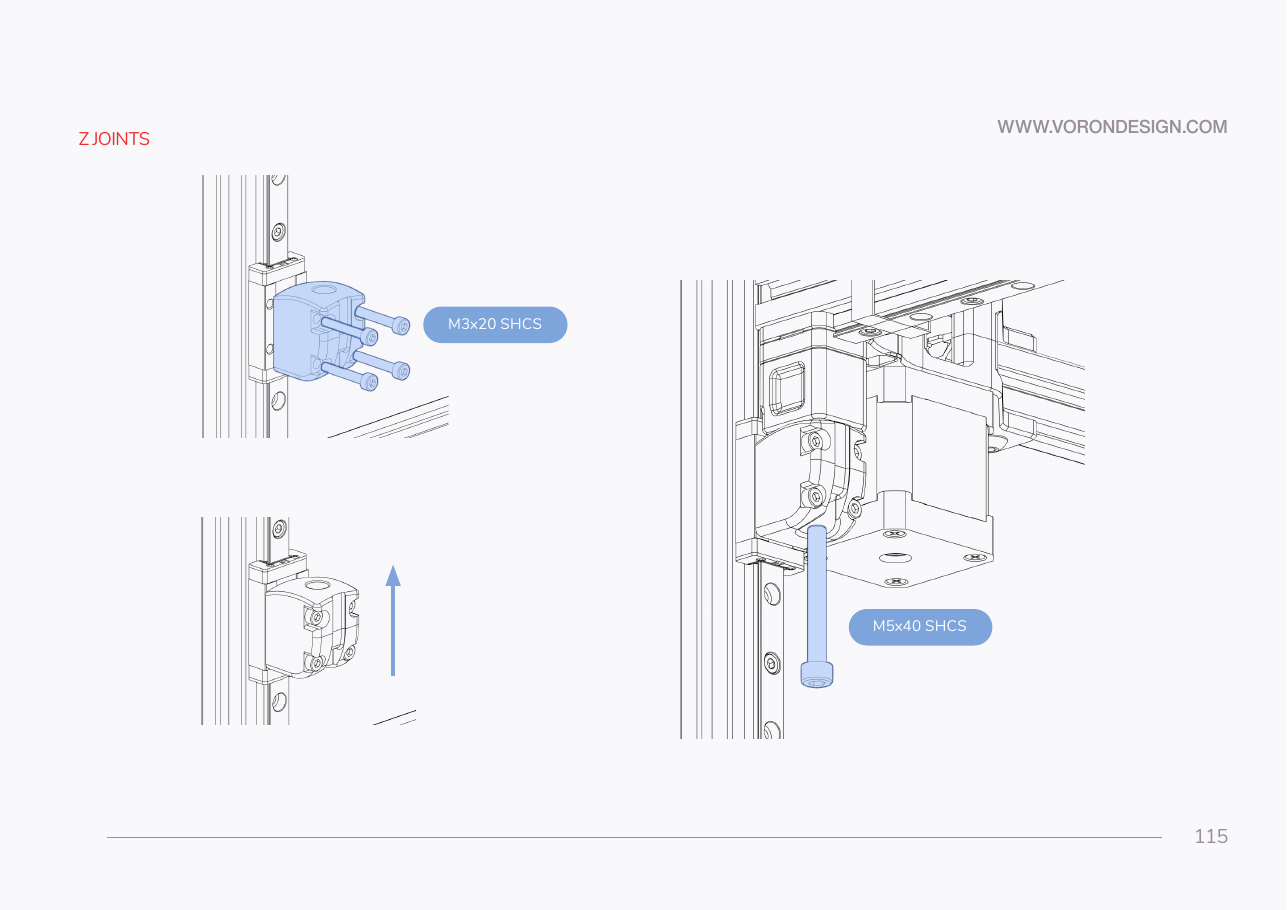
Step 06.9 — Fit the four lower Z joints to the Z carriages¶
Step 9 of 42 · Chapter 06 — Z axis (and Chapter 06b — Gantry squaring)
Tap to enlarge
 Gather for this segment — steps 06.9–06.10 (~25 min)
Fasteners, Tools & Misc box
- M3×20 SHCS ×16
The Z rails
- Rubber rail stopper ×4
Printed parts
z_joint_lower_x4×4 · bin 06-Z-joints
Already on the bench
- the four
z_rail_stop_x4on the rail tops, if fitted · bin 02-Z0, 02-Z1, 02-Z2, 02-Z3
Parts:
-
z_joint_lower_x4×4 · bin 06-Z-joints - M3×20 SHCS ×16 · Fasteners, Tools & Misc box
Do: Bolt one z_joint_lower to each MGN9 Z carriage with four M3×20 SHCS, driven horizontally into the carriage's tapped face. The domed top with the central bore faces up. Tighten evenly, corner to corner, firm.
 Check
All four joints sit flat on their carriages at the same rotation, and each carriage slides a few centimetres clear of the rail screws.
What you're looking at
The z_joint_lower is the other half of each Z joint: it bolts sideways onto the MGN9 carriage riding the upright's Z rail, and its domed top is what the gantry's bearing block lands on. Four M3×20 per corner and no fewer.
Caution
Rev D+ / LDO: This page (and p.116) is done before the gantry install on p.114, not after. LDO: "We recommend completing steps on page 115-116 then use the rubber rail stopper under the Z joints mid rail. This will allow you to set the Gantry on page 114 on the joints without the need for long zipties." src
Source: Voron manual p.115 · LDO Build Notes § Voron 2.4 build FAQ · Video: Part 4 @0:58:18