Step 08.1 — Sort the printed parts and confirm the hotend code
Step 1 of 65 with a helper · Chapter 08 — Toolhead: Stealthburner, Clockwork 2, Revo HF, Nitehawk-SB V2
Tap to enlarge
 Gather for this segment — steps 08.1–08.8 (~35 min)
Fasteners, Tools & Misc box
- heat-set insert, M3×5×4 ×18
Printed parts
main_body.stl×1 · bin 08-CW2motor_plate.stl×1 · bin 08-CW2[a]_latch_shuttle×1 · bin 08-CW2[a]_guidler_a×1 · bin 08-CW2[a]_stealthburner_main_body×1 · bin 08-SBstealthburner_printhead_revo_voron_rear_cw2×1 · bin 08-SB
Set out for later steps
- all B02 and B06 toolhead prints
- the two
revo_voronprinthead halves - CW2 Chain Anchor Tilted ×1
Already on the bench
- the X carriage on the gantry
Parts:
- all B02 and B06 toolhead prints · set out now, fitted later
- the two
revo_voronprinthead halves · set out now, fitted later
Do:
- Lay the parts out in build order; bag the Klicky set aside.
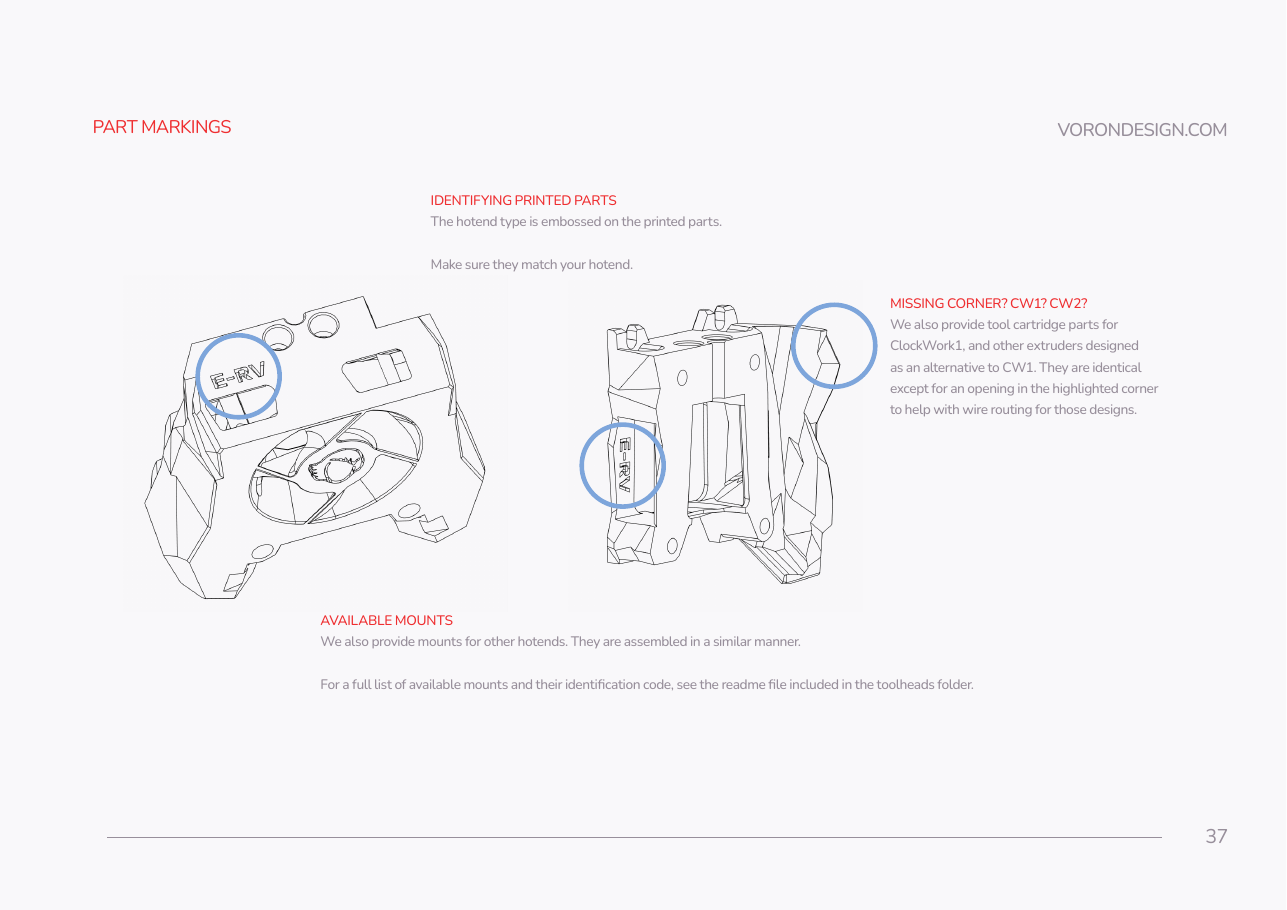
- Read the code on both printhead halves: it must say E-RV, E3D Revo Voron.
- Confirm the rear half is the
_rear_cw2variant, circled corner solid.
 Check
E-RV on both halves, and the circled corner of the rear half is closed. A different printhead folder means reprinting.
 Helper Reads the moulded code on each printhead half aloud and sorts the prints into build order.
What you're looking at
Stealthburner is the toolhead: a shroud carrying two fans and three LEDs around a removable tool cartridge that holds the hotend. The two printhead halves are that cartridge; their moulded code says which hotend they fit. CW1 variants have the circled corner cut open.
 Tip
the revo_voron folder is the settled choice for this kit; the SB printhead README maps "E3D Revo Voron → E-RV". src
Source: SB manual p.37