Step 10.65 — Lay the harness into the chains
Step 65 of 80 with a helper · Chapter 10 — Wiring and Checkpoint #1
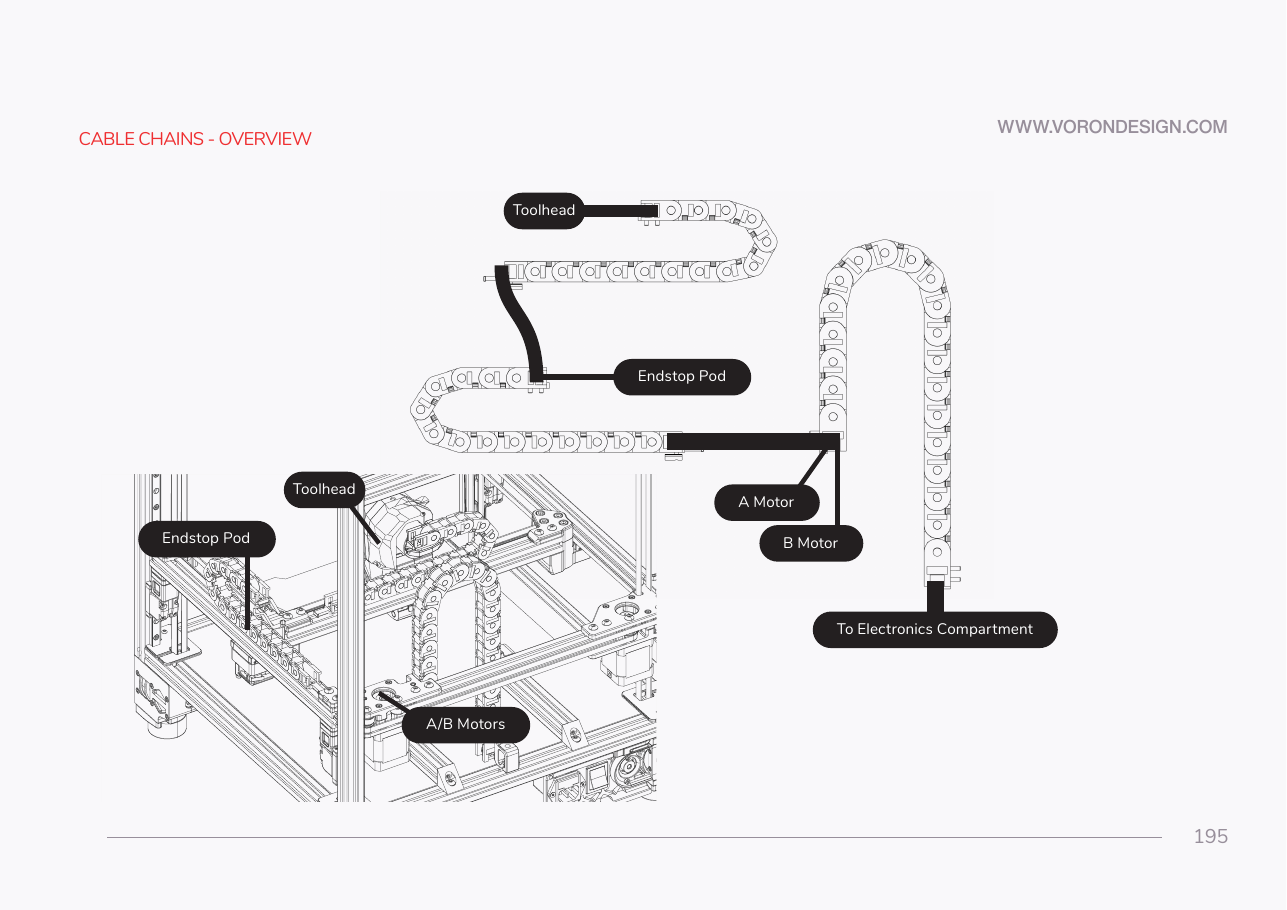
Tap to enlarge
 Gather for this segment — steps 10.65–10.67 (~25 min)
Tools and consumables
- 2.5 mm flat screwdriver
- zip ties, 12
Already on the bench
- the umbilical
- the XY endstop cable
- the A and B motor bundles
Parts:
- the umbilical · already on the bench
- the XY endstop cable · already on the bench
- the A and B motor bundles · already on the bench
- 2.5 mm flat screwdriver · tool
Do:
- Pry each latch only on its screwdriver-icon side, lay cables in, press each latch shut.
- Fill in order: umbilical alone in X, umbilical plus XY endstop cable in Y, both plus A and B motor bundles in Z.
 Check
Every latch clicked shut. With the gantry mid-travel, you can pinch each cable inside a link and slide it a few millimetres.
 Helper Holds each chain latch open with the flat screwdriver while the adult lays the cables in.
What you're looking at
Every drag-chain link has a hinged latch down one side, marked with a small screwdriver icon on the side you may pry. With the latches open the chain is an open trough, so cables are laid into it rather than threaded through it.
Note: the umbilical's nominal bend radius is 28 mm and the X and Y chains are R18. LDO ships this combination and rates the cable for drag-chain use, but it is the cable most likely to fail first — which is exactly why the next two steps exist.
Caution
Pry a latch only in the small indent on its screwdriver-icon side. Prying the other side breaks the latch. LDO cable-chain guide
Caution
Rev D+ / LDO: LDO note p.194–195 — "When running wires in the cable chain, it is important to keep the wires loose. Pulling the wires tight inside the cable chain will result to excessive wire fatigue and possible pre-mature wire breaks." This is the most-repeated warning in the whole LDO documentation set. src
Source: Voron manual p.195 · Voron manual p.194 · LDO cable-chain guide · LDO Build Notes p.194–195 · Video: More Extras! @2:18:20 (differs: no toolboard — loom to the mainboard; this kit runs a Nitehawk-SB V2 on one USB+24 V umbilical)