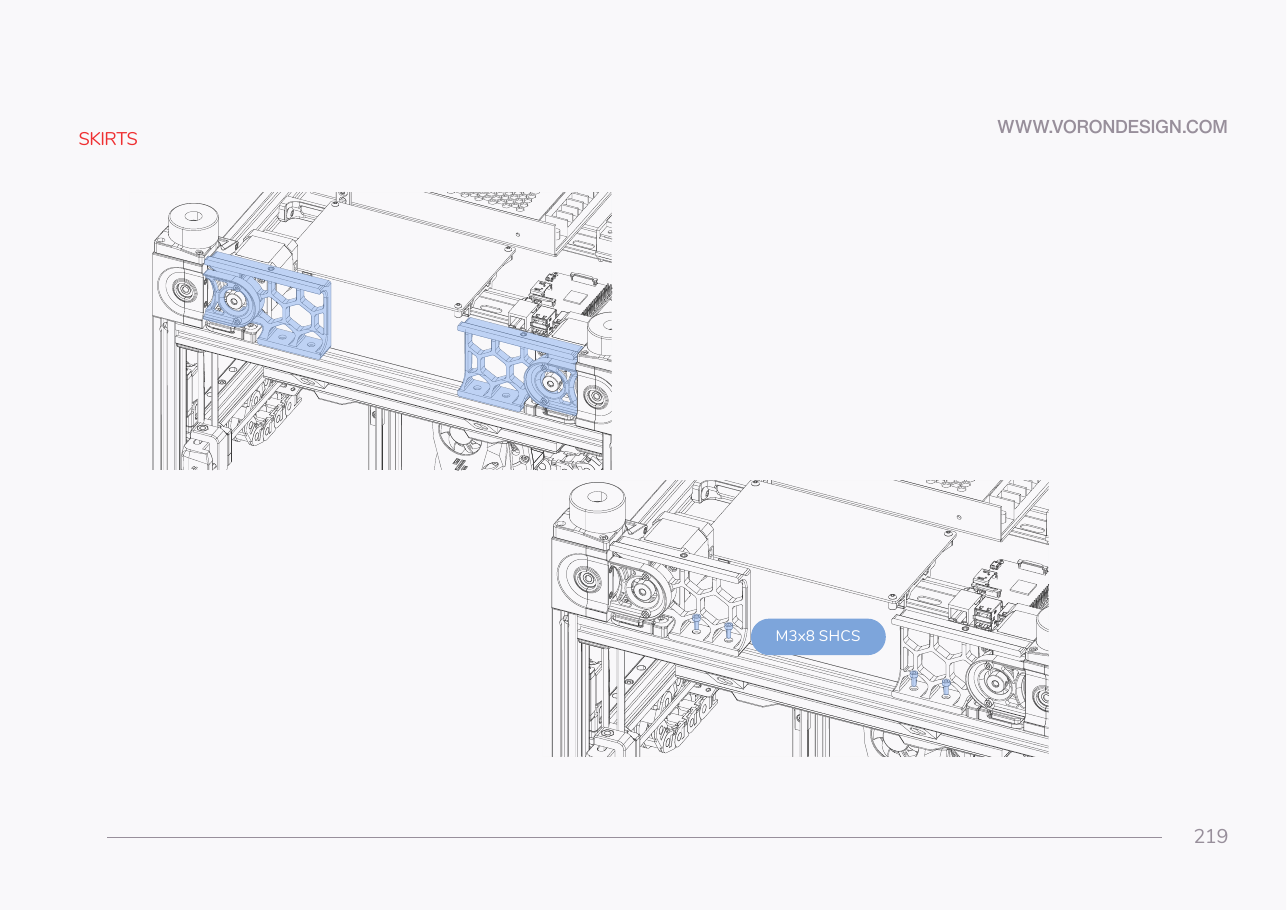
Step 11.13 — Mount the front skirt segments
Step 14 of 67 with a helper · Chapter 11 — Skirts, panels, Clicky-Clack door, filtration
Tap to enlarge
 Gather for this segment — steps 11.13–11.17 (~20 min)
Fasteners, Tools & Misc box
- M3×8 SHCS ×14
- M5×10 BHCS ×2
Printed parts
front_skirt_a_350×1 · bin 11-skirtsfront_skirt_b_350×1 · bin 11-skirtsrear_center_skirt_350×1 · bin 11-skirtsside_skirt_a_350×2 · bin 11-skirtsside_skirt_b_350×2 · bin 11-skirts
Already on the bench
- the four front T-nuts
- the fourth belt guard
- the populated
keystone_panel· bin 11-skirts power_inlet_IECGS_1mm, already on the frame · bin 09-bay- the four rear T-nuts
- this side's two M3 T-nuts
- the right-hand fan support with both fans
- this side's M5 T-nut
- the left-hand fan support with its retainers
- this side's three T-nuts
Parts:
-
front_skirt_a_350×1 · bin 11-skirts -
front_skirt_b_350×1 · bin 11-skirts - M3×8 SHCS ×4 · Fasteners, Tools & Misc box
- the four front T-nuts · already on the bench
Do:
- Hang each front skirt on its T-nuts, belt-guard aperture over the front Z-drive pulley, and drive two M3×8 SHCS up from underneath.
- Snug them, back off a quarter turn, push both hard against the TFT module, then tighten.
 Check
Front run reads as one continuous band: skirt–module–skirt with equal, tight joints and a flush top rail. No daylight at the front Z-drive apertures.
 Helper Holds each front skirt against the touchscreen module while you drive its screws.
What you're looking at
The front run is the most-looked-at part of a finished Voron: skirt, touchscreen module, skirt, reading as one continuous band. Snugging first and only then closing the joints is what makes the two seams disappear.
Source: Voron manual p.219