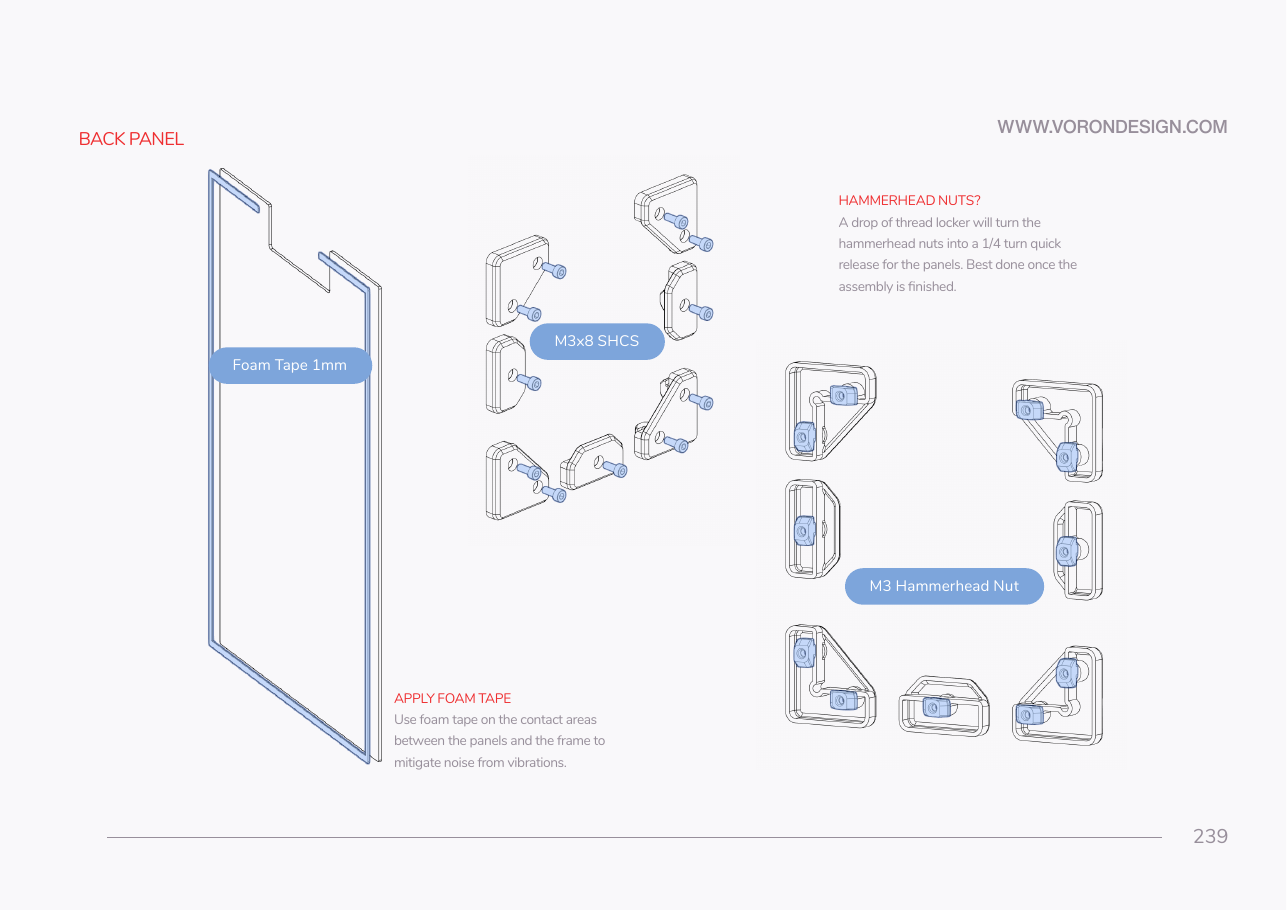
Step 11.52 — Foam-tape the back panel
Step 53 of 67 with a helper · Chapter 11 — Skirts, panels, Clicky-Clack door, filtration
Tap to enlarge
 Gather for this segment — steps 11.52–11.55 (~25 min)
Motion box
- 4mm Bowden Coupler ×1
Fasteners, Tools & Misc box
- M3×8 SHCS ×11
- M3 hammerhead T-nut ×11
- M3×12 SHCS ×2
- M3 heat-set insert ×2
- M5 roll-in T-nut ×2
- M5×10 BHCS ×2
Panel Kit box (carton 2)
- back panel, acrylic, black, 483×503×3 mm ×1
Printed parts
corner_panel_clip_4mm×4 · bin 11-clips-4mmmidspan_panel_clip_4mm×3 · bin 11-clips-4mmexhaust_cover×1 · bin 11-finishexhaust_filter_grill×1 · bin 11-finishCMD_V2_6B_154mm_DUCT_COVER×2 · bin 11-lids-DCCMD_V2_6B_90DEG_COVER×2 · bin 11-lids-DCV2L_90DEG_COVER_MIRROR×1 · bin 11-lids-DCV2L_58mm_DUCT_COVER×3 · bin 11-lids-DCV2L_130mm_DUCT_COVER×1 · bin 11-lids-DCV2L_70mm_DUCT_COVER×1 · bin 11-lids-DCCMD_Remix-V3_DUCT-2B_45deg_LID×2 · bin 11-lids-DCV3L_10mm_DUCT_COVER×1 · bin 11-lids-DC, 10-lids-ACV3L_154N_DUCT_COVER×2 · bin 11-lids-DCV3L_T_REG_N_COVER×2 · bin 11-lids-DC
Tools and consumables
- 1 mm foam tape
- soldering iron with the LDO insert tip
Already on the bench
- the back-panel clips, exhaust cover and grill
- the reverse-bowden PTFE
Parts:
-
CMD_V2_6B_154mm_DUCT_COVER×2 · bin 11-lids-DC -
CMD_V2_6B_90DEG_COVER×2 · bin 11-lids-DC -
V2L_90DEG_COVER_MIRROR×1 · bin 11-lids-DC -
V2L_58mm_DUCT_COVER×3 · bin 11-lids-DC -
V2L_130mm_DUCT_COVER×1 · bin 11-lids-DC -
V2L_70mm_DUCT_COVER×1 · bin 11-lids-DC -
CMD_Remix-V3_DUCT-2B_45deg_LID×2 · bin 11-lids-DC -
V3L_10mm_DUCT_COVER×1 · bin 11-lids-DC, 10-lids-AC -
V3L_154N_DUCT_COVER×2 · bin 11-lids-DC -
V3L_T_REG_N_COVER×2 · bin 11-lids-DC - back panel, acrylic, black, 483×503×3 mm ×1 · set out now, fitted later
- 1 mm foam tape · consumable
Do:
- Open the bottom panel and snap every DC loop lid on. Close it.
- Peel the protective film from both faces of the back panel.
- Run 1 mm foam tape on the frame-side contact areas, corners butted.
 Check
Every DC lid seated, no wire pinched under one. Continuous 1 mm tape on all four edges, none where a clip sits, film off.
 Helper Holds the back panel steady and peels the tape backing ahead of you.
What you're looking at
The back panel is 3 mm black acrylic. The 1 mm foam tape on its inner perimeter is a noise damper between acrylic and aluminium, not a gasket, so it is thinner than the 3 mm used on the sides.
DC lids
left off at Step 10.71 for the meter. Ch 13 has now run every motor, heater and fan, so they close now, before any panel. Fallback middle run: its lids instead of the 154N and T_REG_N ones. LDO layout: snap the PVC duct covers on.
Caution
Back and top panels get 1 mm foam. Side panels get 3 mm. Mixing them up either lets the gantry rub a side panel or leaves the back panel proud of its clips.
Source: Voron manual p.238 · Voron manual p.239